Pages

September 30, 2013

Happiness!


I decided to join in the Berry71Bleu sketch and mixed media challenge this month so used their gorgeous sketch and added some stamping, masking and misting! I love this sweet photo of my daughter Aisling, I just wish she would look at the camera more often, so many photos I have of her have her looking in the distance!


I decided to use my Martha Stewart Texture Effect and my new Prima brick wall mask...I just love the look it has with the mist and the texture! I added some Maya Road birdcages, some Kaisercraft die cuts and some gorgeous Tresors de Luxe lace and flowers to finish it off.


Thanks so much for looking!!

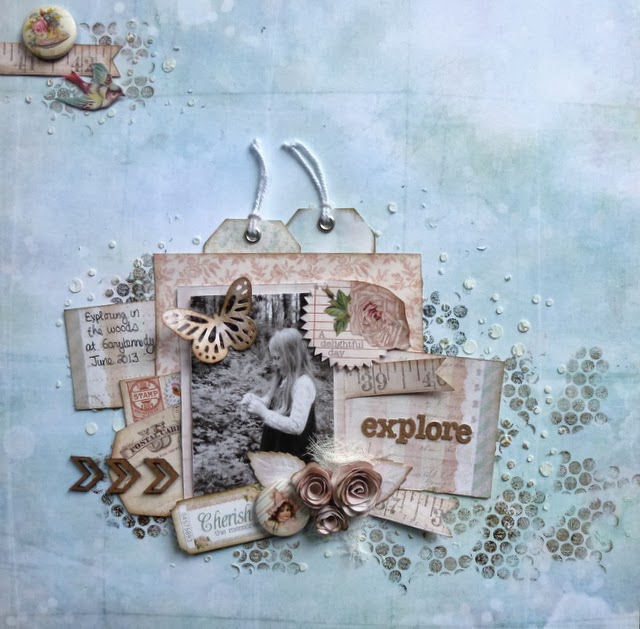
Explore


I pulled out my Prima Delight papers and embellies again for this layout. I just love this bubbly background page, lots of texture and soft colors on this one.

I decided to use the gorgeous Prima BAP sketch:


I used lots of scraps to layer under my photo. The photo is of Aisling during a forest walk we took back in June, exploring the woods and looking for fun things to collect. I also used some of the paper to make a few flowers for the layout and punched out a butterfly from the Martha Stewart Monarch punch.


I added some UmWow Chevron Confetti, a ticket, and a couple of the Flairs from the Delight collection.


I fussy cut the bird and ruler images from the paper collection, then added lots more bubbly circles using my Heidi Swapp Confetti Stencil and some molding paste. I added a little stamping and some

And because I had a gorgeous fussy cut teacup I decided not to use on the layout, and lots of leftover papers and embellies, I whipped up this card with the leftovers... Love when I can do that!!


This week Frosted Designs are having a special on their Prima Delight range, so if you like these papers and embellishments as much as me, run right over to the store (**US store only**) and use the coupon code: PRIMA30 for 30% percent discount on their Prima items in the store! The coupon is good till October 5.

I'd love to enter this in the Non 4x6 Photo Challenge at Merly Impressions, it is an odd size about 2.5 inch x 4 inch!


September 26, 2013

Imagine, Dream, Inspire Canvas - Thursday DT Post for Visible Image


Hello friends!! It is Thursday and time for my post at Visible Image!! This week I made a canvas featuring one more than last week, lol, 8 of the Visible Image stamp sets!!!  I started the canvas by spraying several Lindy's Stamp Gang mists over the canvas. I then started layering stamping. I used Sepia Archival ink for my Grunge Flourishes around the edges of the canvas. I also used it for the Retro Dots Background stamping I did.


The Imagine Dream Inspire stamps were done with Chipped Sapphire Distress Ink...I let them get blurred and misted for a dreamy look.  


I added some misted lace and covered it in gesso, as well as stamping gesso onto the canvas using the Grunge Polka Dot stamp.


The chipboard tree was stamped over with the Crackled Background stamp and the Retro Dots Background  I inked the edges in Black Soot Distress ink to define it a bit more. I added the gorgeous script Bronte Border in several ink colors over the canvas, and a few Grunge Check Background stampings. For my final touch I stamped the gorgeous Large Butterfly onto acetate using Stazon Ink in black and fussy cut them out and folding out their wings for dimension.

I really had a lot of fun building up this canvas. I hope you like my project, and if any of these stamps catch your eye, please visit the store by clicking on the links! All international shipping is a flat rate of £3, such a great price!


Visible Image also run a challenge each month on their blog.
This month the theme is:
Use a Visible Image Sentiment stamp on a project and link it up, easy peasy,
and you could win £20 of your choice of Visible Image gorgeousness!
Join us over at our fan page on Facebook or join our GROUP!
This month if you load a Visible Image project you've created in the group,
you also have a chance at another £20 prize, you have to be in it to win it though,
so I hope you have a look at the site and get some stamps and join in.

Last but not least, have a look all the gorgeous stamps on SPECIAL OFFER!!


Head over to our website where there is 25% OFF selected stamps... and selected character stamps are just £5! The stock is limited so be quick to grab yourself an awesome deal! Once they're gone they will revert back to the normal price.

I would love to enter this in the Punky Scraps Texture and Image Inspiration Challenge (I had printed out the image and used the colors for inspiration and stamped into molding paste for the bark of the chippie tree and used gesso and lace for texture!) and the Craft Stamper Challenge!

September 25, 2013

All She Wants to Do is Dance!


All she wants to do is dance!! I have that Don Henley 80s song running through my head now!! My daughter is addicted to ballet, and as she goes up grades, her teacher has encouraged her. She wants to be a professional dancer and it is great to see her so passionate about something. It is a competitive world but if she is serious about this, we will be here to help her along. (Though the idea of long distances travelled for all of this is something I wouldn't mind not having to do lol!!)

This layout showcases some of the new Sophia dies along with a doily die and folder. I just love the amazing flourishes in the Sophia line. I chose to use the Lanvin die and the Stella die, cutting them out in white cardstock and misting them with Shimmerz sprays.


I used the Fresh and Fun Magical Embossing folder for my background paper for the fussy cut image of my daugher, cutting it out in Core'dinations Whitewash cardstock. I used the Couture Creations Sanding Block to bring up the pattern.


I next took the Fantasia Collection Dazzling Doily Die and cut it out of white cardstock again. I cut it in half and inked it with Walnut Stain Distress Ink using the Couture Creations Sponge Daubers.


I then started layering the papers for the layout, putting down the embossing folder first and the lace, tucking the doilies underneath and arranging the flourish die cuts on top... I then took my fussy cut photo of my daughter and lifted it up on 12mm Foam Mounting Tape.


I added several pieces of ballet themed chipboard from Molossi and a few flowers and placed the photo there in the scene. I got my inspiration for this type layout from the gorgeous work of Britt Sviggum and really wanted to try it!


I added some molding paste through a damask stencil and gorgeous script and crackle stamps from Visible Image and some really bright mist from Shimmerz. I had a lot of fun making this!! Hope to see you sharing your work on the Couture Creations Facebook page!!!


Couture Creations products used


Embossed Tag Set for Crop Stop


Hello, Cathi here with a tag set this week for Crop Stop!  I started with a base of No. 8 shipping tags and embossed each of them with different Couture Creations Embossing Folders. Since my two folders had flowers and leaves I thought they would be the perfect home for my butterfly and dragonflies dies, also from Couture Creations!

I embossed the first tag with the the Couture Creations Elegance Collection Poetry Embossing Folder and the other with the Couture Creations Fresh & Fun Collection Magical Embossing Folder. To color the tags I used Radiant Rain Spray in Persimmon, then used my Brushed Pewter Metallic Distress Paint to highlight the raised areas.


I paired the Couture Creations Endless Dreams Decorative Die - Magical Butterfly with the Couture Creations Fresh & Fun Collection Magical Embossing Folder, using a favorite wings quote and Couture Creations Moonlight Self-Adhesive Pearls.


My second tag used the Couture Creations Elegance Collection Poetry Embossing Folder and the Couture Creations Endless Dreams Decorative Die - Summer Dragonfly, again with a wings quote and the Couture Creations Moonlight Self-Adhesive Pearls.

I finished both tags off with Pink Lemonade with Pink Lemonade Organdy Swirls Ribbon and Orange on Orange Organdy Swirls Ribbon tied in a double bow for a fun touch.

Thanks so much for stopping by!!!


From My Stash
No. 8 Shipping Tags
Martha Stewart Cherish PATP

September 24, 2013

Getting the Most from your Scraps of Elegance Kits (Part 2!)


Back again today with MORE cards I made with leftover papers and tons of embellishments for the September Scraps of Elegance kit! Only the pink gingham paper was one I pulled out to use just for cards!. There were many gorgeous tags to cut out in the embellishment add on and I used them for the first two cards here, adding some flowers from the flower add on and pearls from the kit. Doilies ribbons and die cuts all came from my stash.


For my third card, most of it came from the main kit,except the blue flowers from the gorgeous flower add on, and the burlap from my stash. I just love the vintage girl that was part of the Delight papers. I just had to use her! I added some flair and a resin key to finish it off.


Hope that you like the cards! These kits really go so far...I still have so much left to add to my stash!


September 20, 2013

Purely Ornamental!


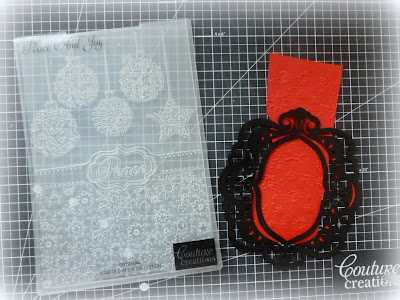
Getting into the holiday spirit a little early with these gorgeous Christmas embossing folders from Couture Creations new Wrapped in Joy collection!!!


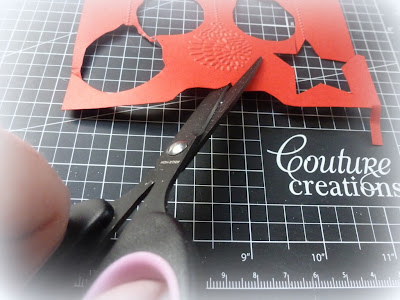
The Peace and Joy folder had these perfect little ornaments ready to fussy cut. I cut out several of the ornaments with my Non-Stick Craft Scissors. The bottom of the embossing folder has a cute snowflake pattern, I used the center of the Fleur de Frame die to cut out an ornament shape.


I also took the gorgeous Christmas tree from the Early One Morning folder embossed in green to fussy cut and add to my card.


I used the tree and two fussy cut ornaments for my first card, lifting up the elements with 12mm Foam Mounting Tape. To finish off my first card, I added Picket Fence Distress Stain over the raised areas of the embossing for a frosted look, adding some black twine for the ornaments and some Couture Creations Adhesive Pearls on the tree. I fussy cut the Peace sentiment from the Peace and Joy folder and layered it on the tree.


My second card I kept very clean and simple, showing off all the texture from the embossing. I lifted all the ornaments up on 12mm Foam Mounting Tape  as well as the Peace sentiment again, adding a few Adhesive Pearls and natural twine to make the ornaments.


Thanks so much for visiting today, I hope you like the cards!! 

  
Couture Creations products used