Pages

Showing posts with label Frosted Designs Kit Club DT. Show all posts

June 10, 2014

Capture the Moment Vintage Love!

.Capture the Moment

I am absolutely in love with the new June Kit from Frosted Designs: Capture the Moment! I am a huge fan of vintage, and this kit is FULL of vintage beauty!! I just love the lush Victorian feel of these papers and colors!!


This vintage beauty in my layout is my Great Aunt Marge! I just love this photo and the story that went with it. She took the photo for her fiancĂ© (my Great Uncle Les) before he went off to war. He had it pinned up by his bunk during training and kept it with him all during the war! I used the gorgeous Prima Time Traveler  and Stationer's Desk papers for this layout, adding the Time Traveler Flairs, Flowers, Brads, Tags and ATCs to my layers!!


In this close up you can see the gorgeous Petaloo Burlap Blossoms, Time Traveler Flowers, Tags, Tickets, ATC and Brads, Wooden ATC, Maya Road Kraft Typography Numbers and the fun bow I made from the Prima Trim.  I added some stiching around my layer and used the The Crafters Workshop Mini Love Post Stencil and the Ranger Forever Red Perfect Pearls Mists to create a heart on my design. I outlined the heart with the Ranger Liquid Pearls - Onyx Pearl.


In this photo you can more gorgeousness from the kit: More Time Traveler flowers, tags, flairs and brads and the gorgeous Petaloo Burlap Butterflies!!  I also used the Prima Family Unit Lace Stickers here and included a Maya Road Kraft Library Card. This photo was a keepsake for my great uncle so I recorded the story on the library card insert! You can see in this closeup where I used the stencil to add some words in black ink and sprayed Ranger Forever Red Perfect Pearls Mist in my background. I also used it to color my Prima Trim.  I had a great time making this vintage layout and really piled on the embellishments...but I still have four cards, another embellie filled layout and an altered frame to show you from this kit, you really get a lot from each kit! I will show the cards here, but there will be more to come later this month!

I love to make vintage cards, so again this kit was right up my alley, and I made four cards this time!!


The base paper of my four cards I made is a sheet of Authentique Abroad papers. I also used Time Traveler ATCs and papers as further layers, as well as the wooden Prima Classic Card pieces. I used the Prima Trim for every card and added in some Prima Time Traveler Brads.  For the top left card I used my gorgeous Prima Resin Frame and Time Traveler Clear Stamps to frame an image of a stamped key.  I love how my four vintage cards turned out and I hope you do too!!

The Messy version of this kit is already sold out and there are not many left of the Clean or Combination Clean and Messy kits. Get yours today by clicking HERE!!!


May 28, 2014

More Fun with Simply Sweet Frosted Designs May Kit!

.Simply Sweet

This month I have had so much fun playing with my Simply Sweet May Kit that I have done a few more extra projects and still have some of the kit left, they really are amazing with so much included!


For my first project I did a canvas, using the The Crafters Workshop Stencil - Live Love Laugh included with the Messy Kit, using Molding Paste to make my designs, and turning the stencil over and reversing the flower for a different look. I added the butterfly in several places as well, I love how you can use part of a mask or redesign your own look by using the mask in different ways.  I also added some molding paste texture using the Tim Holtz Dot Fade stencil included in the February Kit. I took my Autumn Leaves Starburst Spray Set, and sprayed the Tibetan Poppy Teal and Cattail Copper brown on my canvas as a base adding color and bringing out the texture of the molding paste. To highlight the gorgeous flowers and butterflies on my canvas I used my Paradise Pink Glimmer Glaze included in the kit. The butterflies also got a little dot trail following behind them from my Viva Decor Cream Paper Pen.  I added in some inspirational sayings from the Cosmo Cricket Just Because Tiny Text Stickers to my canvas and then finished off my canvas with a bit of stamping using the 7 Dots Cold Country Clear Stamps script stamp and some dark brown inking of the edges using my Prima Knotted Wood Chalk Ink.

For my next project I did a set of three cards using a mix of the Heidi Swapp Dreamy Papers and Melissa Frances The Sweet Life paper, a collection of pastel yumminess!! I used tons of embellishments from the kits to finish them off!


For this first card I used the Melissa Frances papers, layering it up and edging the paper with the Cream Paper Pen. I added stitching to another layer then loads of kit embellishments: Prima Princess Flower, Maya Road Vintage Find Bird and fun buttons from the Dress It Up Embellishments package - Au Jardin Whisper. I added a little sentiment from the Cosmo Cricket Just Because Tiny Text Stickers.


Another fun pastel card using the Melissa France Papers! I stitched around all the paper layer edges, added Prima Princess Flowers, Prima Gillian White Flowers, Heidi Swapp Dreamy Clear Watercolor Words and the Dress It Up Embellishments buttons. I added a bit of twine from my stash.


My final card with lots of zig zag stitching on the layers, Dress It Up Embellishments buttons, Prima Gillian White flowers, Maya Road Crochet Trim and Cosmo Cricket Just Because Tiny Text Stickers.

I really had a lot of fun putting together these cards and the canvas with the May Simply Sweet Kit. There aren't very many left, so I hope that you will run not walk over to the Frosted Designs Store to pick one up for yourself!!


May 21, 2014

Two Looks/One Kit: Simply Sweet Frosted Designs May Kit!

.Simply Sweet

Hi! Cathi here with the first set of project for the Frosted Designs May Kit: Simply Sweet! This month I say set of projects because I have made two layouts, three cards and a canvas this month, my mojo has returned on overdrive!! May sees yet another gorgeous kit from Frosted Designs, full of great papers, gorgeous mediums and perfect embellishments! There are only a few kits left so you need to get yours while you can!!!


My first layout uses some bright papers and some bright photos of my daughters "zorbing" in the park in Limerick a few weeks ago! Zorbing is when you get inside a big plastic beach ball filled with air and then float around in a pool, running in that ball like a hamster on a wheel lol! It is crazy and a lot of fun for them!!
I chose the Heidi Swapp 12x12 Dreamy paper - Choose Happy for the base of my layout, perfect for those photos.  I decided to do a lot of sewing on this to add pattern and texture and will do a mini tutorial about this at the end of my post.


There are so many great embellishments and mediums to use. In the photo above you can see a button from the Dress It Up Embellishments Buttons - Au Jardin Whisper, Maya Road Vintage Stitch Heart Wood Shape, some Queen & Co. Rock Candy bling, and the gorgeous Paradise Pink Glimmer Glaze splatters. You can see where I have stitched wavy patterns across the layout in white to add texture and movement and symbolize the water that is part of the photos as well!


There are some gorgeous Prima Princess flowers in the kit which I have used here as well, just perfect as they echo the circle shapes I have used across the page! To finish off the layout I did a lot of stitching around the edges in waves and zig zags. I added my journalling using the Signo Uni-Ball Impact Bold Point 1mm Gel Pen - White


This second layout I did with the kit has a more vintage look which is more my usual style, though who likes to be pinned down to one style anyway??? I started with the Heidi Swapp Dream Dots paper. Next I used some of the lovely Melissa Frances Bits & Pieces and Heidi Swap Dreamy Tags to layer up. Behind the layers I added the gorgeous Prima Doily Sticker, cut in half and added on two sides.  I added some gesso behind the photo cluster and to highlight the stitching I planned and then used Golden Molding Paste and the Crafters Workshop Stencil: Live Laugh Love. After the molding paste was dry I used the Glimmer Glaze in Paradise Pink to paint it.


Here you can see a lot of embellishments I used, the gorgeous Prima Princess Flowers and Prima Gillian White silk flowers. the Maya Road Vintage Stitch Arrow Wood Shape, Maya Road Vintage Find Birds and Dress It Up Embellishments Button - Au Jardin Whisper.  I lined the photo with the gorgeous Maya Road Crochet Trim and made pearl accents with my Viva Decor Paper Pen in Cream.
I also added lots of zig zag stitching and some splashes of Tibetan Poppy Teal and Cattail Copper Brown from my Lindy's Stamp Gang Autumn Leaves Starbust Spray set.


In this photo you see more stitching, another flower and embellishment cluster and a gorgeous Heidi Swapp Dreamy Word Sticker.  As you can see this kit is full of gorgeous paper and embellishments that lend themselves to lots of different styles!

Sewing Mini Tutorial!!!


Since my post is so long I just wanted to do a short post to encourage you to get out your sewing machine!! I love to use mine on paper, often sewing borders around the edges of my pages trying out wavy lines, zig zag stitches and lots of different thread colors. If you crafted for a while chances are you may have a sewing machine in your craft area! It isn't just for fabric, so pull it out and give it a try!!


Here you can see the wavy lines I created for the backdrop of my layout. It creates movement and texture on the layout and it simple and fun to do, just random stitch across your pages in a wavy pattern, there is no right or wrong.


I added zig zag stitching and border stitching to both my layouts and next week you will see how I used my machine to add texture to my cards as well.

April 30, 2014

Beauty of Nature: Amazing April Kit from Frosted Designs

As you know, I have been through a lot with my family the last few months. I have not been at home all the time, and my dear brother in law has just passed only a week ago from a very short battle with pancreatic cancer. He was only 39.  But the world keeps turning even though we think it shouldn't sometimes, and my amazingly beautiful April kit from Frosted Designs: Beauty of Nature arrived while we were away in Dublin for the funeral last week. I was able to work on some projects this weekend when we arrived home, and it has been great to help me through all this...my creative pursuits are really my therapy.


Beauty of Nature

The beautiful April kit is chock full of 7 Dots gorgeousness in the form of the beautiful Nature Walk papers. Marion Smith's Nirvana collection in the kit is also stunning and I have featured it in my second layout. Feast your eyes here on all the amazing contents in the kit, the only thing I added from my stash here was some thread for my stitching! Beautiful mask, Lindy's magical paints, Tim Holtz Distress Markers, Prima flowers, wood pieces and crochet items...Maya Road metal pieces...UmWow chipboard, this kit is just full of gorgeous products!

Dream Big: Adventure Awaits Layout


For this layout I just had to choose a photo from a nature walk we did a few years back, of course!! The main paper is from the 7 Dots Nature Walk collection. I have also added several die cut pieces from the collection, as well as a sheet from Marion Smith's Nirvana collection under the photo.


I have painted the Chipboard Flourishes from Maya Road in the kit with the gorgeous Lindy's Stamp Gang Magical - Bells of Ireland Green, I just love the gorgeous sheen you get with these shimmery powder paints. I simply used a water brush to apply them.  I used two beautiful Prima Joyous Burlap Flowers for my layout, adding lots of other embellishment to my cluster: KaiserCraft Paper Blooms, Marion Smith Junque & Gems Metal Embellishments - Butterflies, praying mantis chipboards from the Um Wow Nature Walk Insect Chipboard Package, the postage stamp frame from the Prima Wood Die-Cut Icons - Stationers Desk.  Again I painted the chipboard mantises using the Lindy's Stamp Gang Magical - Mission Bells Brown for more lovely sheen.  You can also see several places where I used the Lindy's Mission Bells Brown mixed with molding paste to do my gorgeous masking using the kit's Harlequin Crafters Workshop Template.


In the top corner of the layout I added some more flourishes, frames, die cuts and a flower from the beautiful kit. Here you can see where I used the Bundled Sage and Walnut Stain Distress Markers and the cool new Tim Holtz Spritzer tool from the shop to make green and brown splashes on my page. I finished off the layout with some black stitching around the paper layers.

The second layout features Marion Smith's Nirvana paper. I love this photo of my oldest daughter Aine when she was a baby. I used several sheets from the collection, fussy cutting some flowers for my cluster around the photo. 

Love: Noted


I used more of the Prima Stationers Desk Wood Icons here, the butterfly, inkwell and Noted pieces and the gorgeous "Sweet Love" from the Prima Crochet Icons - Love You set. There are some Nature Walk die cut pieces used here and there and my final Prima Joyous Burlap Flower along with more Kaisercraft Mini Blooms.  


I took my water brush again and used it to drip and sprinkle on some of the Lindy's Stamp Gang Magical - Bells of Ireland Green then took the Tim Holtz Spritzer and my Walnut Stain marker and added splatters. Again I finished off the layout with some sewing around the edges. I really love how this turned out!!


Our new May kit will be out soon, and is another stunner, but I recommend this kit highly, so many gorgeous papers, mediums and embellies, you just can't go wrong.


February 26, 2014

Cherish Good Times: A Layout for Frosted Designs February Shades of Spring Kit


This week I have done another ballet themed layout. I just had to!! I hadn't used the May Arts Tutu Tulle trim in the kit yet!! I've used it here to make....a tutu, lol, and the trim and ribbon for my tag!

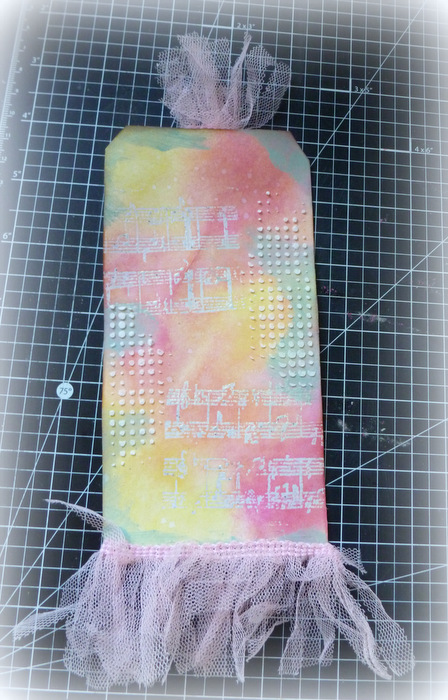
For this layout I used lots of goodies from the kit, making my own tag as an embellishment and main part of my layout! I was able to use the Picked Raspberry and Squeezed Lemonade from the kit long with the Juniper Adirondack paint dabber and the yummy Dot Fade stencil from Tim Holtz.  My tutorial this month will show you how to create a great layered background on your tag using an emboss distress technique along with some water spritzing and stencil and molding paste work.


To start with, take some white card, Versamark, and your Kaisercraft Sheet Music background stamp, which you can find here in the Frosted Designs store.


Ink the stamp up with Versamark and then emboss it using the gorgeous Orbit Olive Gold Embossing Powder from Lindy's Stamp Gang.


Using the Picked Raspberry Distress Ink and Squeezed Lemonade Distress Ink, add the colors using your applicator foam. I mixed the two colors together as well to get a lovely orange shade that toned in well with the Basic Grey Fresh Cut papers in the kit. Give a little wipe over the embossed areas to clean away the distress ink and make the stamped image stand out even more.


Add some drops of water for a very cool effect on the distress inks!!! The water drops effectively bleach out the colors of the distress ink and really add texture to the background.


For a finishing touch to the tag I added some molding paste using the Tim Holtz Dot Fade stencil included in the kit. I thin added the Tutu Tulle Trim to the bottom and as an accent on the top of the tag. The tag is now ready to add to the layout.


I used several different sheets of the gorgeous Basic Grey Fresh Cut paper, cutting out a doily shape with my Mini-8 punch for the layer behind the tag and adding some fussy cut flowers from another sheet. I added some of the raw wooden pieces here, as they didn't need any embellishment and added another color and texture to the design.  Here you can see where I fussy cut my daughter Aine in a ballet pose and added a 3D tutu to her using the gorgeous May Arts Tutu Tulle.


I added some stickers from the Fresh Cut sticker sheet included in the kit and added some gorgeous Kaisercraft blooms to the cluster and the some Petaloo pink hydrangea blossoms from the January kit!!

I also used the Tim Holtz dot fade stencil and molding paste to add gorgeous texture to the background page. I love how the tag blends the colors from the other papers and creates a backdrop for my photo! I hope you like it!


Thank you so much for stopping by!!