Pages

February 26, 2015

On Top of the World Layout for Riddersholm Designs


My daughter was on top of the world this day, riding the London Eye on a trip we took in January! I just love the view captured behind her, you can see the Thames and Parliament.  I thought the Tailgate Marked paper Airborne fit this photo perfectly with all its flying machines and us being so high in the air.


I love to use the cut out titles and words from the Riddersholm collections. Here I have added Travel and What a Day to the layout, popping them up on foam for a bit of dimension.  I had fun with the hot air balloon chipboard piece from Wycinaka, misting it and adding a bit of twine to connect the basket to the balloon. I used some gorgeous Prima and Petaloo flowers from my stash.


My friend Renea makes these gorgeous butterflies which she sells in her Reneabouquets shop, The color of this one matches perfectly with the papers and flower. I popped on a fun camera paperclip from Maya Road.


I decided to title my layout "On Top of the World" because you felt that way at the top of the London Eye, a huge ferris wheel!! I journalled a bit about our day where my daughter auditioned at a ballet school in the morning and then we had fun around London in the afternoon, what a great day.

February 25, 2015

XOXOXO

This week at La-La Land Crafts the theme is a Sketch! Here is the sketch we used:


Here is my take on the sketch! This week I did a layout and hope I transferred the sketch into this form well enough!


I used the gorgeous Blue Fern Studios Sanctuary papers for this layout and of course I used lots of gorgeous La-La Land Crafts dies !!


In this close up you can see the gorgeous Large Lacy Border Die  which I used as the repeating element from the sketch behind my photo.  I used some gorgeous Prima and Petaloo flowers from my stash to create a cluster around my photo which I fussy cut.  My title flag came from the Stitched Elements die set and I added the beautiful Berry Flourish Die to my flower cluster.


I cut out the Fancy Butterfly Die  in white card and then inked it to match the colors in my layout. For the color in the background of the layout I used my Raspberry gelato. I have owned most of the gelatos for a long time now but haven't really played a lot with them, so it was good to get one out and have a play! I also added a bit of background stamping.

I played along with this challenge at ARTtastic using the colors and image for inspiration. I tried to use a photo that had a similar position to the artist's model in the painting and think this worked pretty well!!


For a finishing touch I added a lot of random stitching around the edges.

I hope you like my layout this week!! 
Don't forget, you can join in all the fun at La-La Land Crafts 
by adding your creations to our Facebook Page and Twitter.

February 18, 2015

Ready for Spring Card at La-La Land Crafts


This week at La-La Land Crafts the theme is Ready for Spring! 

I found this beautiful vintage image and thought it represented Spring perfectly! To fit in with the theme I layered lots of La-Land Crafts dies on my card. 

First I added some corrugated cardboard for a base to my design, I added some gesso in places to age it. Next I added the beautiful Bird Cage Die.  Next I added my vintage image. I stitched around my card base and photo again, I really love the look that gives my cards!! I added some beautiful La-La Land Crafts Cherry Blossom Flowers, which I inked in Ripe Persimmon Distress Ink to tone in with the image. I added a flower from my stash and a twine bow, then added lots of the Cherry Blossom Branch Die pieces to the base of the card to complete the look.

I hope you like my card this week!! 
Don't forget, you can join in all the fun at La-La Land Crafts 
by adding your creations to our Facebook Page and Twitter.

February 16, 2015

Crazy Loving You Layout for Berry71bleu Favorite Things Challenge!

This month's challenge over at Berry71bleu is a MoodBoard challenge with a theme: Things You Love!!!


Join our February Challenge and share some of the things you love! Our challenge host Dana created this mood board using images that caught her eye on Pinterest. Whether you like birds or butterflies, flowers or feathers, postcards or old books, or something else entirely, just have fun creating a project showcasing the things or people you love. Feel free to incorporate photos, patterns and colors from the mood board in your project, but please do not feel required to use these images. This challenge is specifically about the things you love - no restrictions!

Here is my take on the challenge, featuring many things I love: my daughters, our 15 year baby kitten lol who still runs around and plays with toys like she was a young kitty, and lots of favorite scrapbooking goodies: flowers, chipboard, stamps, stencils, molding paste, mists.... I had a lot of fun putting this together!!


The paper images I used are digital images from the CATfile store. I used paper from the 7 Dots Studio (Soulmates Collection ) and flowers and metal piece from Zeus and Zoe Etsy Shop.


Here you can see lots of layers of stamps, stenciling, flowers and the fun files from CATfile store.  I was able to change the colors of some of the digital files in Photoshop to match my theme.


On the photo I was able to take one of the digital word files and turn it into a "brush" on Photoshop. This allows you to add the text, change the color of it, its opacity, and its size...you can have a lot of fun with digital files that way!


I love the handmade flowers I got from  Zeus and Zoe Etsy Shop as well as the great metal piece that says love, perfect!!

I really enjoyed making  this layout and I hope you like it!!
I also hope you come play along with us this month!!


Check out the fabulous prizes donated by our generous sponsors:

First Prize: $15 Gift Voucher to the CAT File Store


Second Prize: Art Workshop Kit Club - Pocket Life Kit


Sponsors:


CAT File was founded in May 2014 as a family business of two people: Pawel and Mira. We are a small online store providing fresh and colorful digital designs: cut files and printables dedicated mostly for scrapbooking purposes. We love documenting our life and CAT File is our way of sharing this passion with others. It's the platform where crafters from all over the world can gather together, find an inspiration and give it. It's also the space that we created for young designers to grow and develop their skills.


Art Workshop Kit Club, located in Poland, is a joint effort of Agnieszka Arnold, a huge fan of handicraft and the owner of Art Workshop, and Tusia Lech, designer, coordinator of many scrapbooking ventures and owner of 7 Dots Studio. Our main mission, as a Kit Club, is to get your creative juices flowing. Each month we offer unique scrapbooking kits, with great products inside. We carefully choose the products for each kit, so they match each other and inspire you. Each month there are two main kits - Scrapbooking and Pocket Life. In these kits you will find patterned papers from various manufacturers, colored cardstock, 3x4'' and 4x6'' cards, stickers, alphas, stamps, chipboard, strings, ribbons, crystals and coming soon Art Workshop Kit Club exclusive products.

Please note that if the winner(s) of this challenge are international they will be responsible
 for shipping costs. Make sure you follow our CHALLENGE RULES.

We appreciate each and every challenge entry and share the designs that catch our eye on our Facebook page and Pinterest Boards. Look for your work there! 

Thank you and we hope to see your beautiful creations this month!

February 13, 2015

Valentines Day is coming!!


This week I decided to make my husband a Valentines Day card using my gorgeous Riddersholm papers in non-typical Valentines colors!  I chose a vintage image in my stash that had the perfect coloring to match the papers and got started!!


I used the Retro Light paper from the Fall Flea Market collection. I added a gorgeous Prima flower from my stash and some Riddersholm Ink It Cherry Blossom flowers which I left white to tone in with the papers.


Under my image I used a beautiful die cut doily from my stash. The hearts on the doily were just perfect...I unked under the doily to help it stand out.  For some finishing touches I added a twine bow and some stitching around the edges of the image and card.


I hope my husband likes it, but I know I do, lol and I am the one who will probably enjoy it more!!


Hope you have a wonderful Valentines Day! 

February 11, 2015

Valentines Day with La-La Land Crafts


This week at La-La Land Crafts the theme is Valentines! 
We were asked to use this photo to inspire us to create something.

I just love to use vintage images for my cards, so I chose this sweet lady! Behind her I added the Heart Doily Die, putting the central bit of the heart up on foam squares and inking the edges to add a bit of dimension. I added the "Love" title and the hearts from the Hanging Hearts & Love Words dies.  To add some flowery touches to the card, I used my favorite Rolled Rose Large Die  and Rolled Rose Medium and Small dies, adding some pearls to the centers. I then used the Creepy Vines Die to add some leaves.

To finish off my card I stitched around the edges and added some twine bows. I love the romantic feel of the card!

Don't forget, you can join in all the fun at La-La Land Crafts
 by adding your creations to our Facebook Page and Twitter.


February 5, 2015

DIY Planner Bookmark Tutorial for La-La Land Crafts


Planners are a big trend in the papercraft industry at the moment and I have to admit in the last few weeks I have been swept up in the craze. I used to have filofaxes and calendars and planners but then went digital for many years. Now that I am a scrapper, cardmaker and all around papercrafter, it was only a matter of time before I was lured back into using planners, especially with all the options for creativity that now seem to abound! I am making my own planner with personalized inserts and calendars, so of course when I wanted a bookmark for my planner I decided I needed to make my own, and thought I would do a tutorial for making one using some of my gorgeous La-La Land Craft dies.


To start your project gather up the papers you would like to use for your bookmark and a pattern for the base of the page you would like to make. I wanted a wide bookmark so that it could hold sticky notes and I could write out my meal plans on one side! I designed a page that would fit the height of my book and not quite as wide and I added a little tab at the top to mark the page. I chose to use several dies from La-La Land Crafts: the Cherry Blossom Branch DieGarden Bench DieStitched Nested Circles and Stitched Elements banner die.  I thought that the Cherry Blossom Branch Die and the Garden Bench Die fit perfectly for our photo inspiration challenge this week: 


Take your pattern for the bookmark shape and cut it out from your pattern paper.


Next, cut out your die cut elements from your other papers.


I wanted to personalize my bookmark by making a banner to say "This Week" and then the days of the week inside little circles. I chose my font on the computer and then printed out the text I wanted, making sure it fit within the space in the die cuts.  By printing the text out on a sheet of copy paper, you can then take a smaller piece of your patterned paper and check that it will fit the text as below.


I added a strip of double sided adhesive to the top of the patterned paper. 


Adhere the piece of pattern paper over the text on the copy paper, making sure not to put the adhesive over the text part but just above it so that you can remove it easily.


Now take the piece of copy paper with your pattern paper adhered to it and run it through
your printer, printing out the same text. It will print out in the same place onto your patterned paper. Remove the pattern paper from the copy paper.


Align the die cuts over the text centering them as best you can 
and then run them through your die cutting machine.


Once all your pieces have been cut out, glue them down to your bookmark base sheet.


Place your bookmark in a laminating sheet and run it through a laminator.


Trim around your bookmark and leave some of the laminating plastic on the left side where
you will be punching your holes. I used my Cinch machine to punch my holes, but you can
easily use a single hole punch. You can use a piece of paper from your planner to mark your
holes to make sure they are spaced correctly. This could be used for a coil or ring binder
type planner, just adjust the holes accordingly.


To make this bookmark easy to move from day to day, cut a slit on every hole, 
this will let you pull it off and reposition it whenever needed.


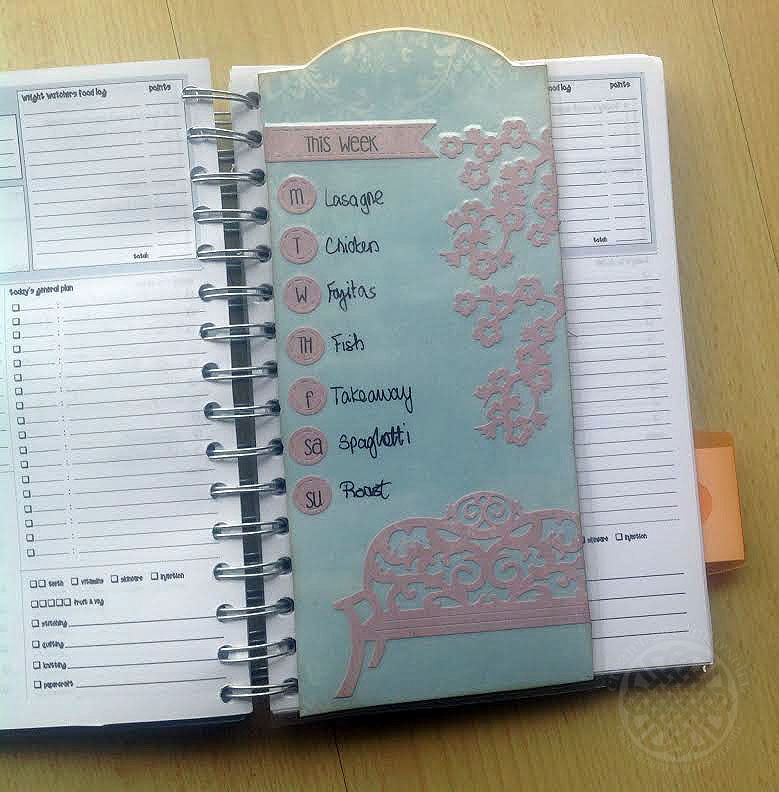
Here is my bookmark slotted into my calendar space in my planner!


And here it is with my meal plan set up in it! You can write on the laminating plastic with
sharpie and use alcohol wipes (or I use nail polish remover!) to erase it for the next week!


I hope you found this tutorial useful. Give it a try, it is a lot of fun and
makes a very practical addition to your planner!

February 4, 2015

Planner Bookmark

This week at La-La Land Crafts the theme is Photo Inspiration! 
We were asked to use this photo to inspire us to create something.


I decided to us both the images and the colors for my inspiration, to make this fun planner bookmark!


Planners are a huge trend in the paper crafting industry right now and I have been having fun making my own planner using customized pages and fun DIY projects. I needed a bookmark and I thought it would be fun to make a tutorial on how to create one of these and to use some of my beautiful La-La Land dies to decorate it! I will be doing a tutorial tomorrow on how I achieved this so I hope you will come back and check it out!!

I used gorgeous Pion papers to get the beautiful colors from the inspriaton photo. I love how theblue has a subtle cloud background, perfect for the little scene I have created sing the Cherry Blossom Branch Die  and Garden Bench Die.  I used the Stitched Nested Circles to create my little days of the week symbols for the bookmark and the flag from the Stitched Elements die set worked perfect for my "This Week" title. To see how I created this fun project, check back tomorrow!! I had a lot of fun making this and it works perfectly in my planner!!

Don't forget, you can join in all the fun at La-La Land Crafts
 by adding your creations to our Facebook Page and Twitter.